Usage Guide
This guide explains how to use the modern React-based Mermaid to Dataverse application to transform Mermaid entity-relationship diagrams into Microsoft Dataverse solutions, tables, columns, and relationships with intelligent validation and Common Data Model (CDM) integration.
Getting Started
1. Initial Setup
The application is deployed to Azure App Service. See Deployment Guide for deployment instructions.
2. Prerequisites
- Mermaid ERD file (
.mmdextension) with valid ER diagram syntax - Dataverse environment with admin access
- Global Choices file (optional) - JSON file with choice definitions if needed
Overview
The application provides a modern React wizard interface with Fluent UI v9 components for uploading Mermaid ERD files and automatically creating corresponding Dataverse entities. Once deployed, access the React application: https://your-app-name.azurewebsites.net
Key Features:
- Smart CDM Detection: Automatically identifies Common Data Model entities
- Intelligent Validation: Real-time error detection and auto-corrections
- Type Detection: Smart data type mapping based on field names
- Modern UI: Intuitive React wizard
- Secure: Azure Managed Identity authentication
Use the Wizard
Step 1: ERD Upload & Intelligent Validation
- Browse: Upload your Mermaid ERD file (
.mmdextension) using the modern file upload component
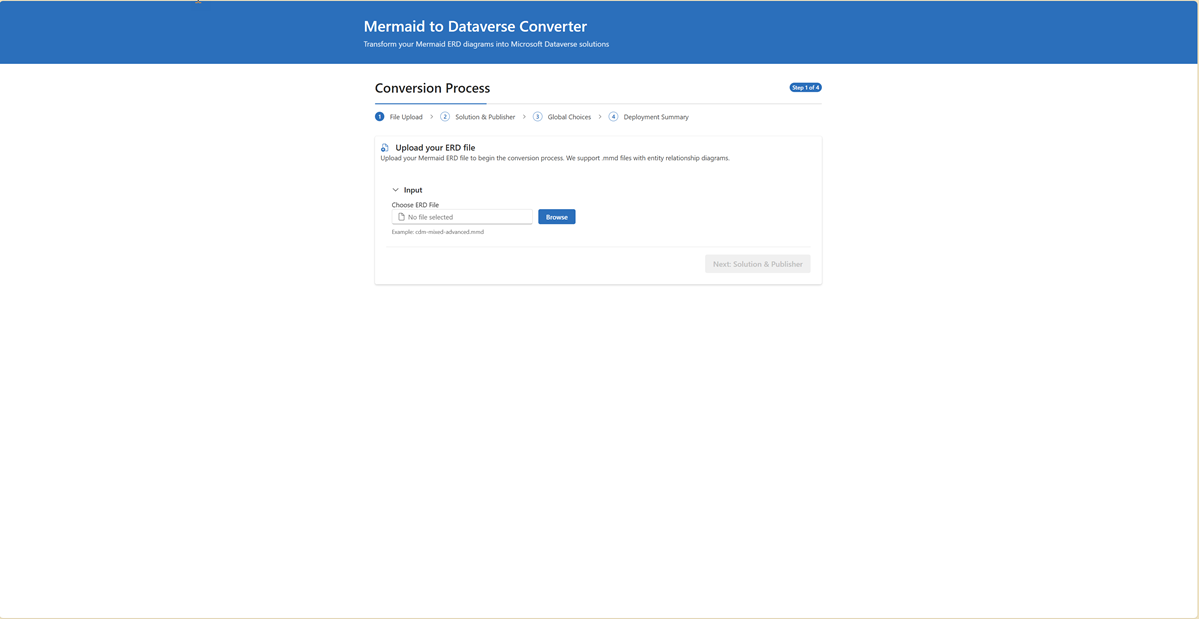
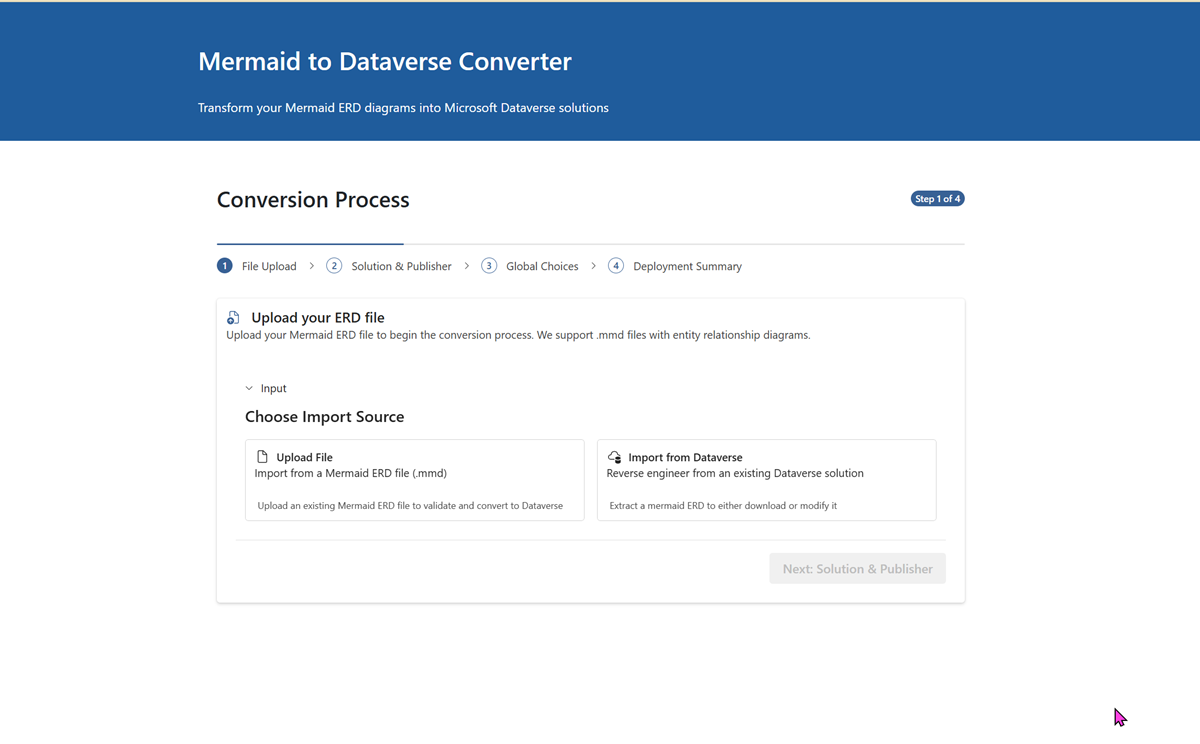
- Import: You can also as an alternative choose from your already existing solutions in your Dataverse environment - either to copy the .mmd file or to deploy it again.
- Real-time Parsing: Immediate ERD structure analysis and entity detection
- Smart Validation: Comprehensive validation with automatic error detection:
- CDM Detection: Identifies entities matching Common Data Model (e.g., Account, Contact)
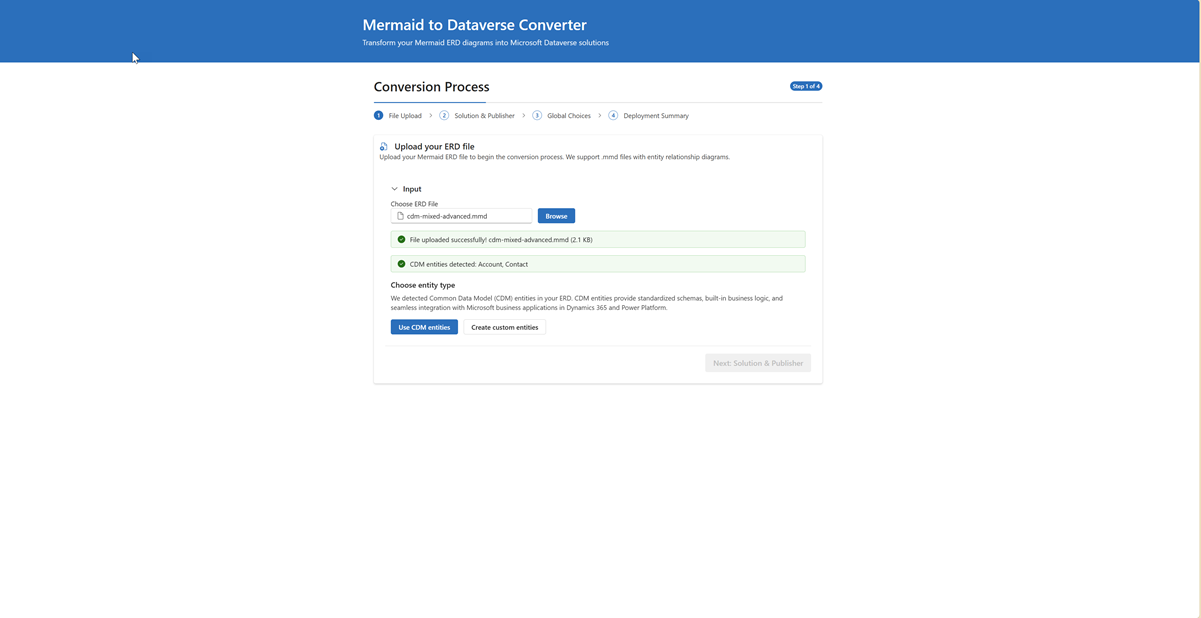
- Naming Conflicts: Detects conflicts with Dataverse system columns
- Status Columns: Automatically filters out status columns (uses Dataverse built-in status)
- Primary Key Issues: Validates primary key structure
- Data Type Mapping: Smart type detection based on field names
- Auto-Corrections: View suggested fixes with side-by-side comparison
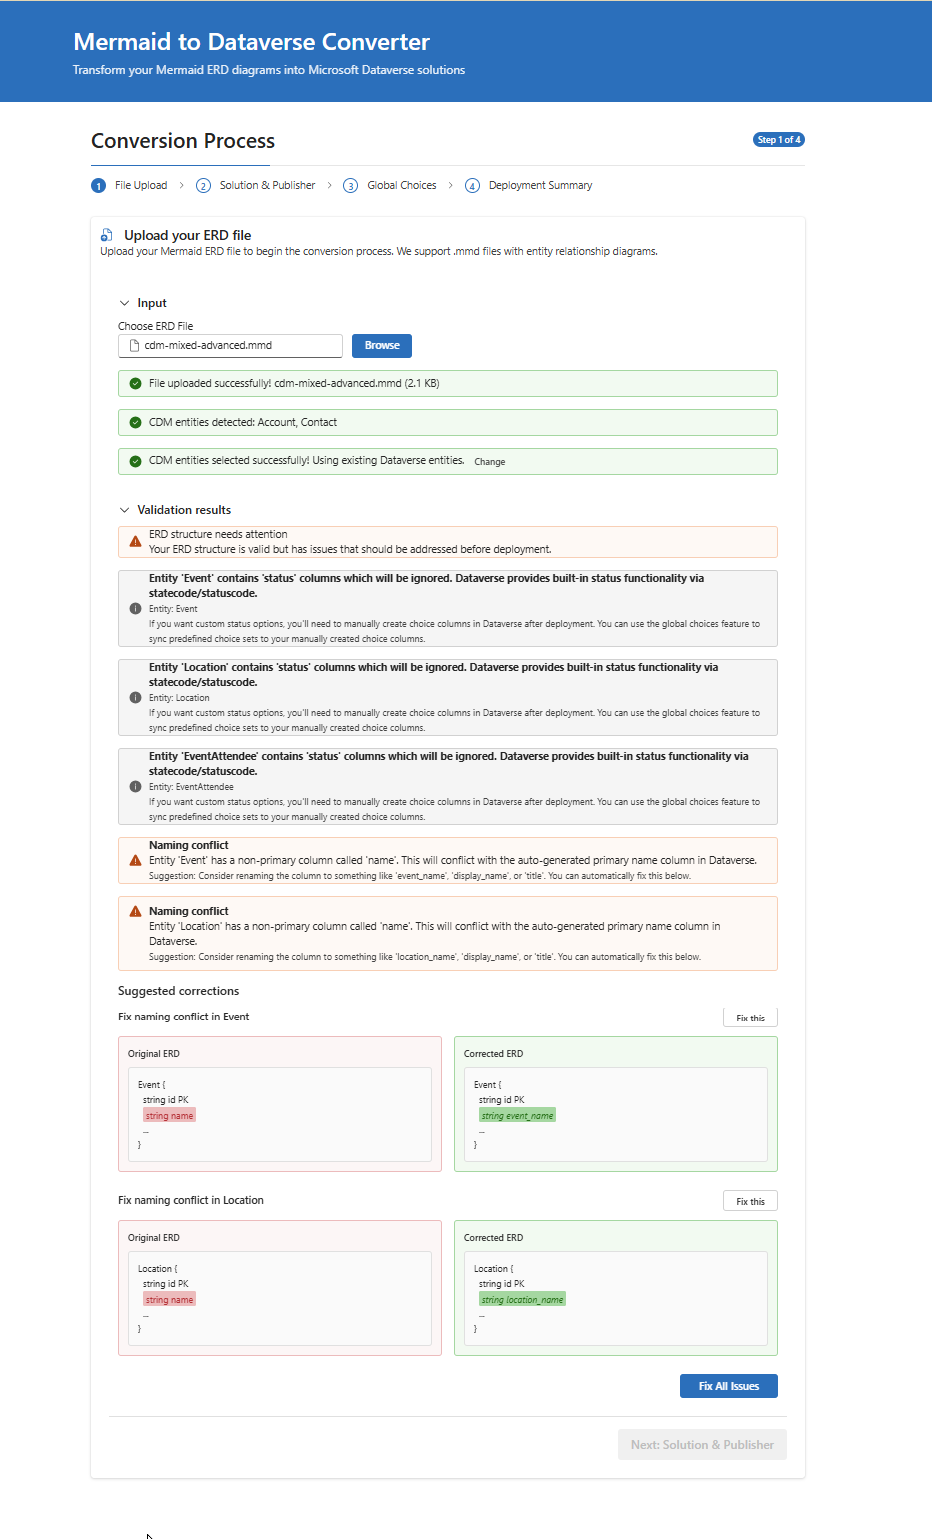
- Select Next to proceed
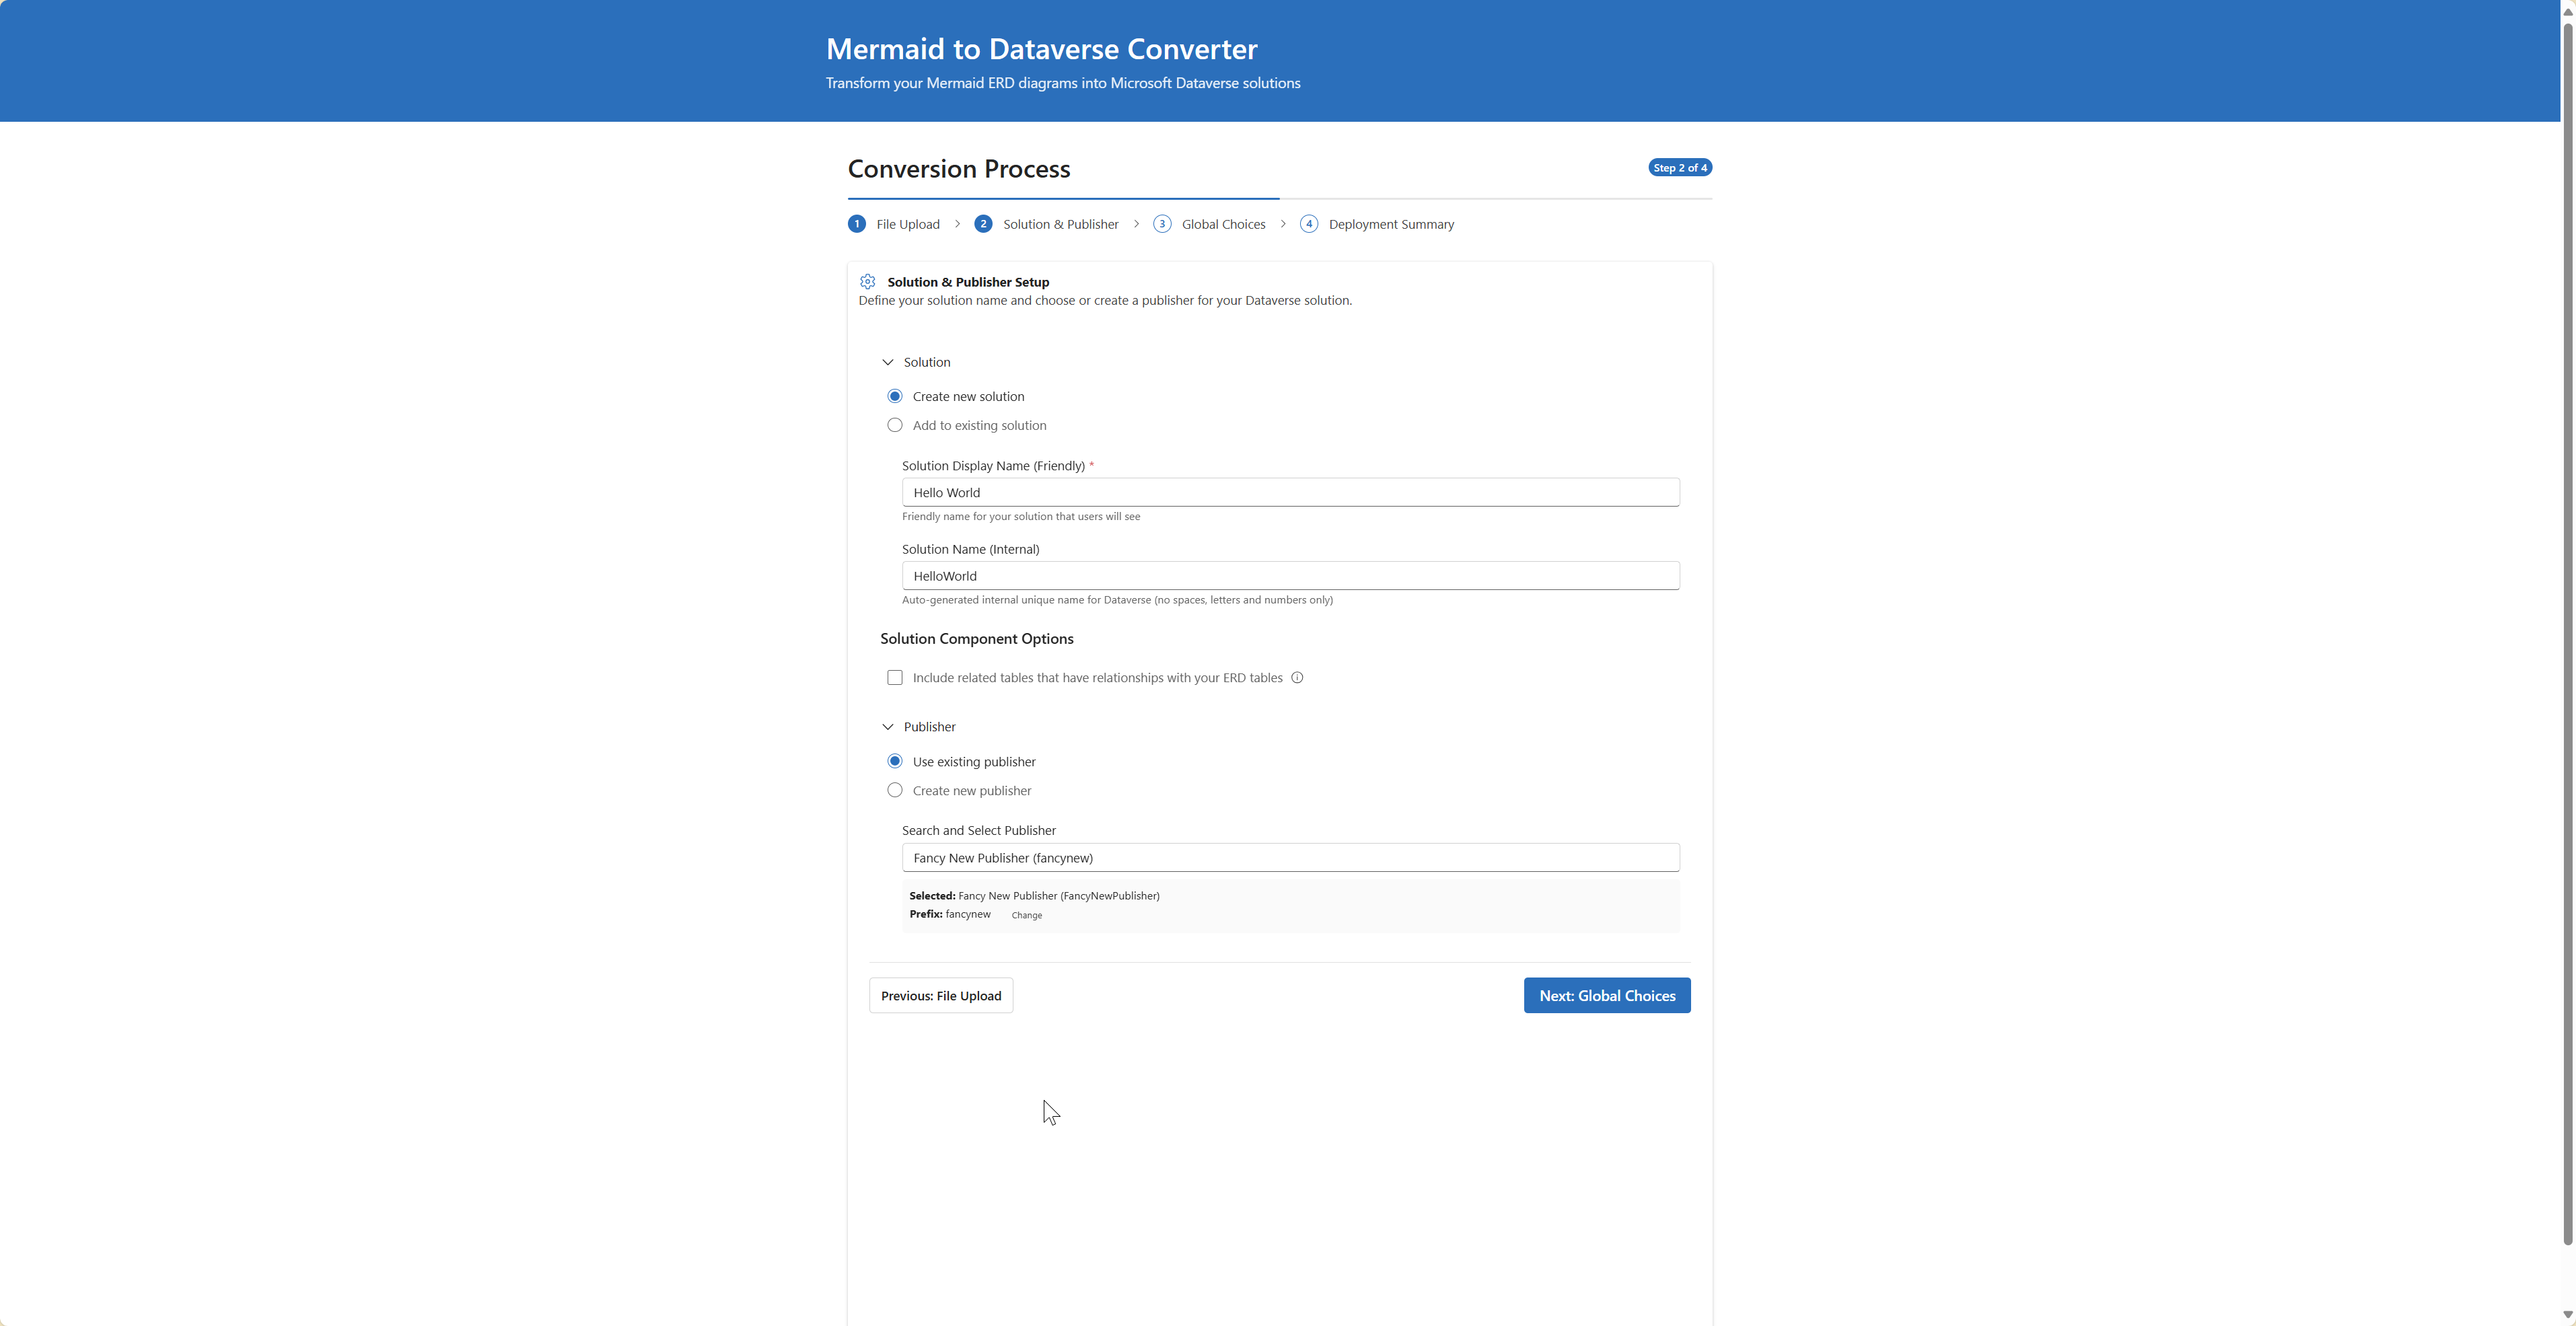
Step 2: Solution & Publisher Configuration
- Solution Name: Name for your Dataverse solution (e.g., "Customer Management") or choose from an existing solution
- Publisher Selection: Choose an existing publisher or create a new one with the React interface
- Publisher Prefix: 3-8 character prefix (e.g., "cmgt") with real-time validation
- Select Next to continue
Step 3: Global Choices Integration
- Upload JSON: Upload JSON file with global choice definitions
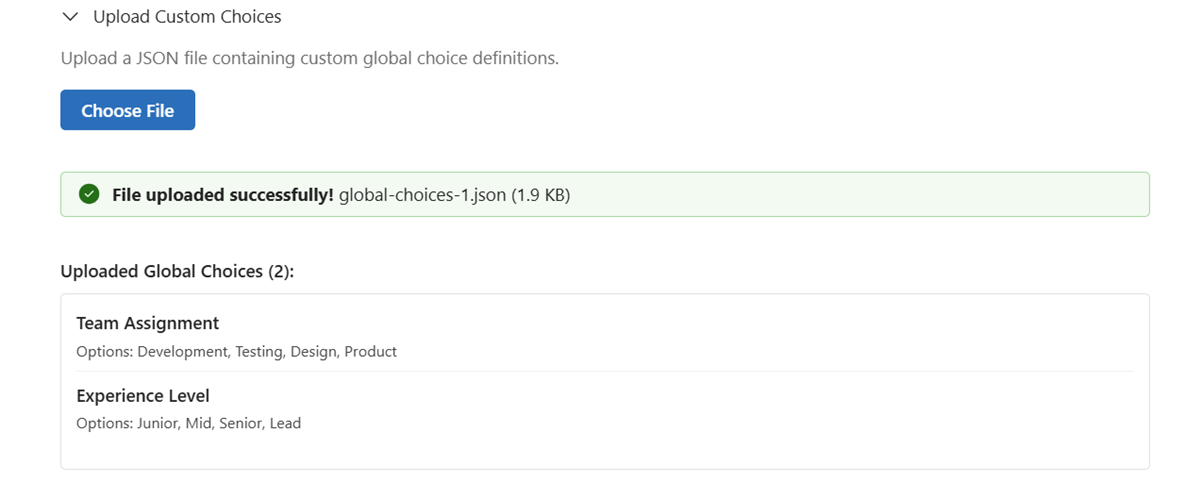
- Browse Existing: View and select from existing Dataverse global choices
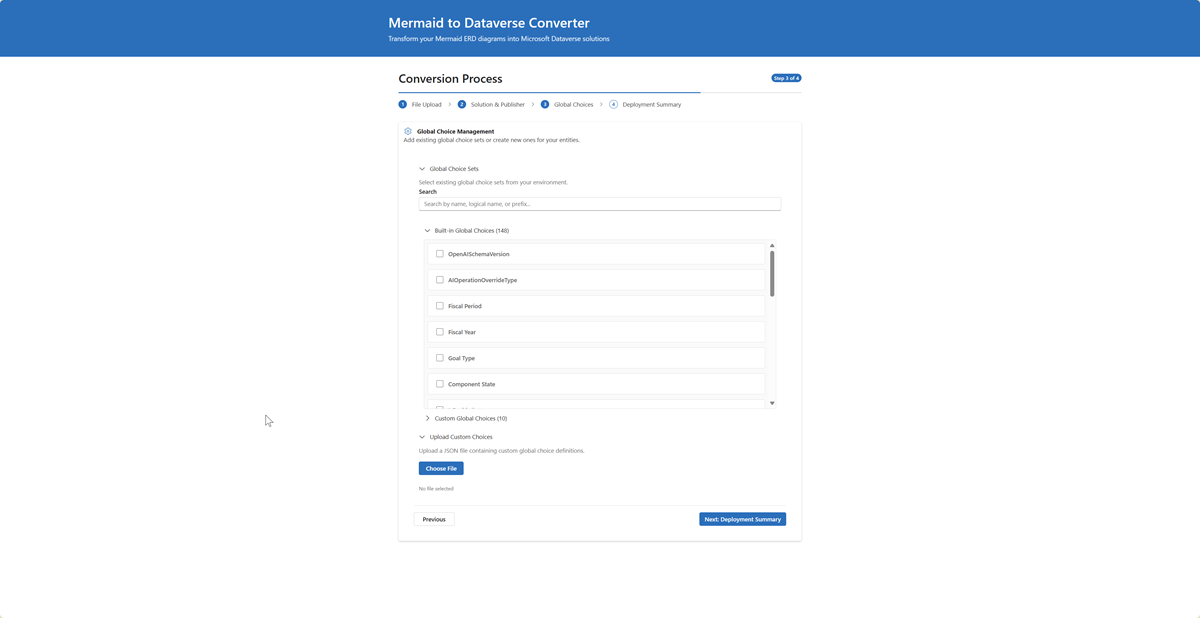
- Preview Choices: Real-time preview of choice sets before deployment
- Combined Selection: Mix new and existing choices in a single deployment
- See Global Choices Guide for detailed documentation
- Select Next to continue
Step 4: Review & Deploy
- Configuration Summary: Complete review of all settings with modern UI
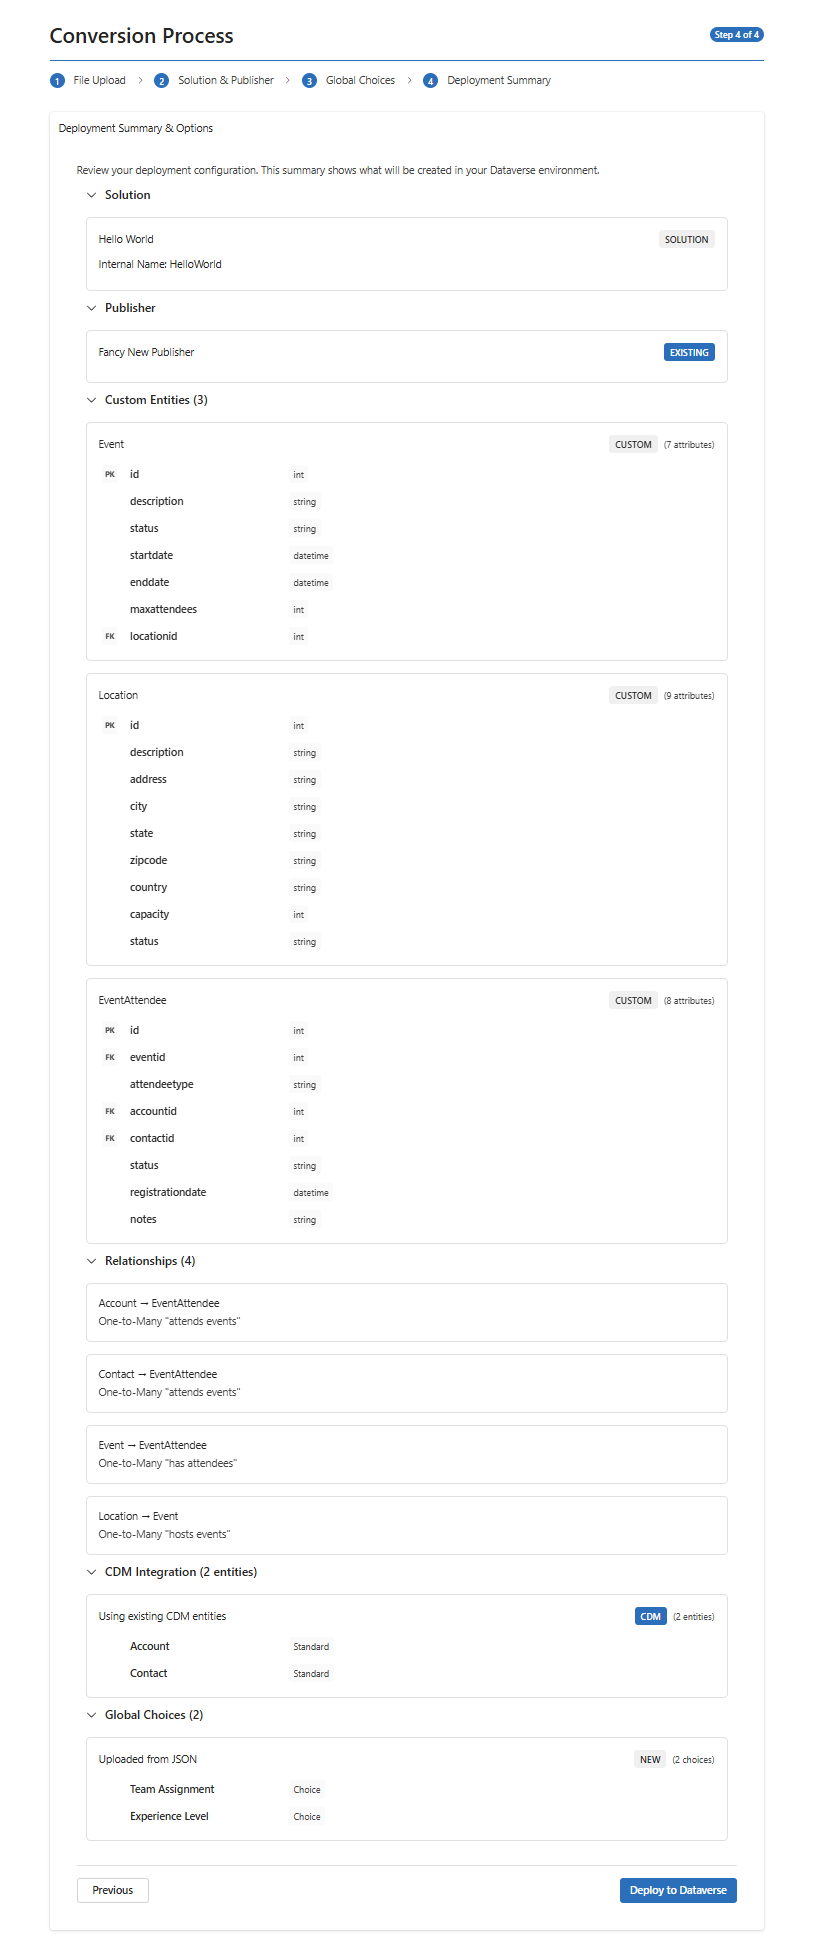
- CDM Integration Summary: Clear display of CDM vs. custom entity choices
- Real-time Validation: Final validation before deployment
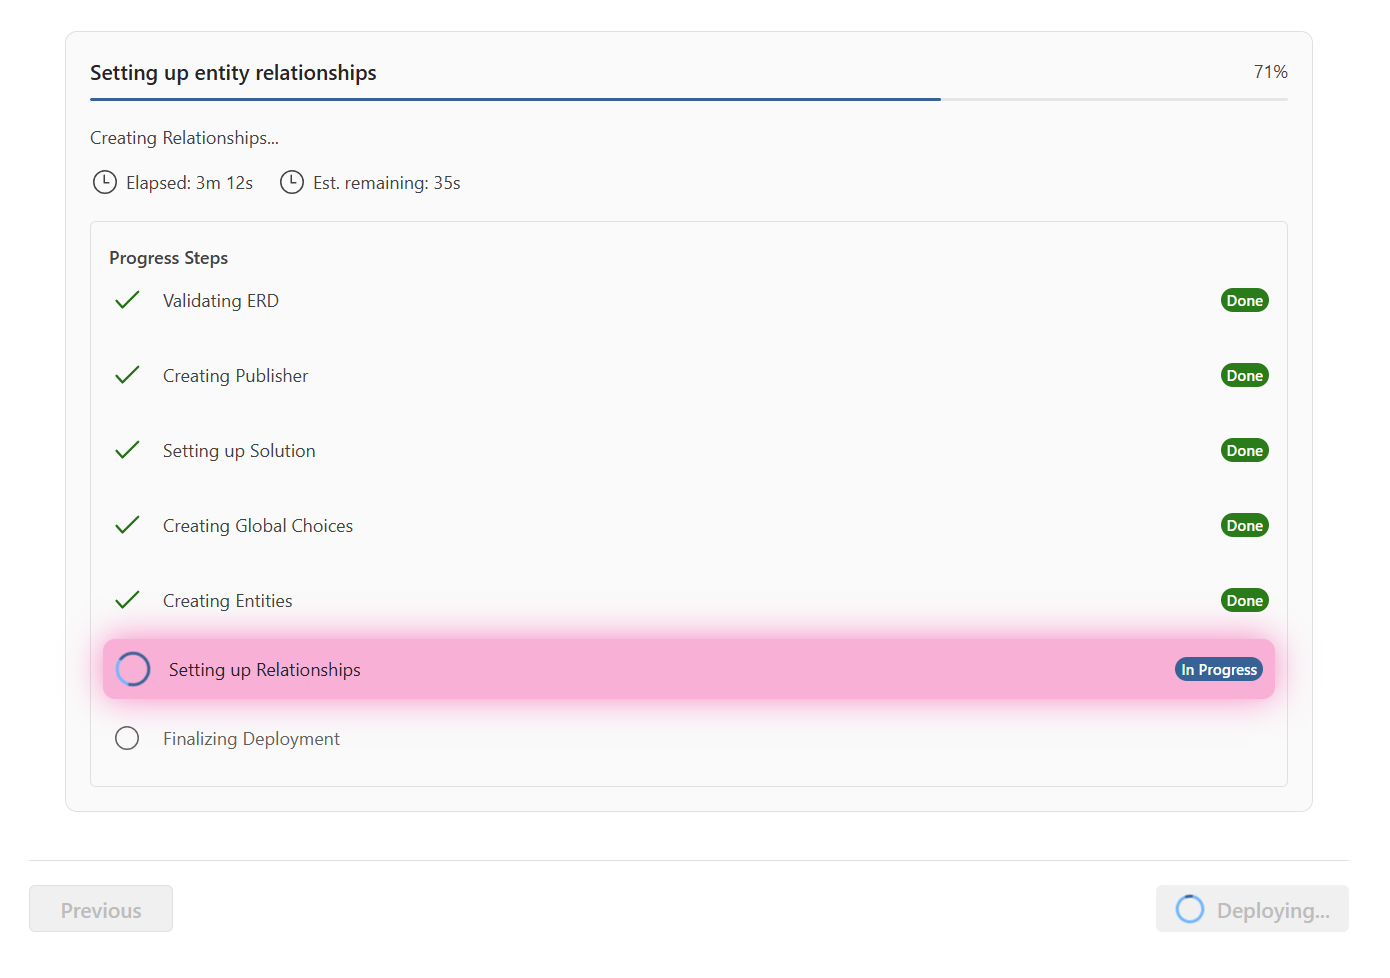
- Deploy: Select Deploy to Dataverse to create your solution with live progress tracking
And finally

Deployment History & Multi-Environment Management
After deploying your solutions, you can track and manage them across multiple environments using the Deployment History feature.
Viewing Deployment History
- Open History Modal: Click the "View History" button in the application header
- Environment Filter: Select which environment to view:
- All Environments: See deployments across all configured environments
- Specific Environment: Filter by Dev, Test, or Production environment
- Environment Badges: Each deployment shows a colored badge indicating its environment:
- 🔵 Blue: Development environment
- 🟣 Purple: Test environment
- 🟢 Green: Production environment
Deployment Details
Each deployment record shows:
- Solution Name: The Dataverse solution that was created
- Environment: Where the solution was deployed (with colored badge)
- Status: Success, Failed, or Partial
- Timestamp: When the deployment occurred
- Solution Link: Direct link to view the solution in Power Platform
- Deployment Details: Expandable section showing:
- Deployed entities and their properties
- Relationships created
- Global choices used
- Any errors or warnings
Rolling Back Deployments
You can safely reverse a deployment and remove it from Dataverse:
Eligibility Requirements
- Deployment must have status "success" or "partial"
- No dependent deployments exist
- Solution components must be removable
How to Rollback
- Select Deployment: In the deployment history, find the deployment you want to rollback
- Check Environment: Verify the environment badge shows the correct target environment
- Click Rollback: Click the "Rollback" button next to the deployment
- Confirm: Confirm the rollback operation
- Monitor Progress: Watch the real-time progress tracker showing:
- Relationship removal
- Entity deletion
- Global choice cleanup
- Solution removal
- Publisher cleanup (if applicable)
What Gets Removed
The rollback process removes components in this order:
- Relationships: All relationships between entities
- Custom Entities: Tables created during deployment (preserves data where possible)
- Global Choices: Choice sets that were created
- Solution: The Dataverse solution (if no other components remain)
- Publisher: The publisher (if no other solutions use it)
Multi-Environment Rollback
The rollback system is environment-aware:
- Rollback operations target the specific environment where the deployment was created
- You can safely rollback from Dev without affecting Test or Production
- Each environment maintains its own deployment history
- Rollback buttons only appear for eligible deployments in each environment
Intelligent Validation & Auto-Corrections
The React application includes sophisticated validation that provides real-time feedback and intelligent fixes:
Common Data Model (CDM) Detection
The system automatically analyzes your entities and detects potential CDM matches:
What happens:
CDM Detection Results:
- Contact detected: Matches CDM Contact entity
- Account detected: Matches CDM Account entity
- 💡 Recommendation: Use existing CDM entities for better Power Platform integration
User Choice:
- Use CDM entities: Leverage existing Contact and Account with built-in relationships
- Create custom entities: Proceed with your custom entity definitions
- Mixed approach: Use CDM for some, custom for others
Automatic Problem Detection & Fixes
Primary Column Conflicts
Problem detected:
Customer {
    string customer_id PK
    string name "Customer name"  // Conflicts with auto-generated primary column
}
Auto-suggested fix:
ERD
Customer {
    string customer_id PK
    string customer_name "Customer name"  // Renamed to avoid conflict
}
Status Column Filtering
Original ERD:
Order {
    string order_id PK
    string status "Order status"  // Will be automatically ignored
}
System handling:
- Status columns automatically filtered out during deployment
- Built-in Dataverse status fields (Active/Inactive) used instead
- Suggestion provided to create choice columns manually for custom status values
System Column Conflicts
Problem detected:
Task {
    string task_id PK
    string ownerid FK "Task owner"  // Conflicts with Dataverse system column
}
Auto-suggested fix:
Task {
    string task_id PK
    string task_ownerid FK "Task owner reference"  // Prefixed to avoid conflict
}
Smart Type Detection
The system includes intelligent field name analysis for automatic type improvement:
Email Detection:
Contact {
    string user_email "User email"      // → Automatically becomes 'email' type
    string contact_email "Contact email" // → Automatically becomes 'email' type
}
Phone Detection:
Contact {
    string mobile_phone "Mobile number"  // → Automatically becomes 'phone' type
    string office_tel "Office telephone" // → Automatically becomes 'phone' type
}
URL Detection:
Company {
    string website_url "Company website" // → Automatically becomes 'url' type
    string homepage "Company homepage"    // → Automatically becomes 'url' type
}
Complete Data Type Support
| Mermaid Type | Dataverse Type | Description | Auto-Detection |
|---|---|---|---|
string | Single Line Text | Text up to 4,000 chars | Email, Phone, URL detection |
text / memo | Multiple Lines Text | Large text fields | N/A |
email | Email with validation | Auto-detected from field names | |
phone | Phone | Phone with formatting | Auto-detected from field names |
url | URL | URL with validation | Auto-detected from field names |
int / integer | Whole Number | Integer values | N/A |
decimal | Decimal Number | Fixed precision decimal | N/A |
money | Currency | Currency with formatting | N/A |
boolean / bool | Two Options | Yes/No values | N/A |
datetime | Date and Time | Full timestamp | N/A |
date / dateonly | Date Only | Date without time | N/A |
float / double | Floating Point | Floating point numbers | N/A |
ticker | Ticker Symbol | Stock ticker | N/A |
timezone | Time Zone | Time zone identifier | N/A |
language | Language | Language LCID | N/A |
duration | Duration | Duration in minutes | N/A |
file | File | File storage | N/A |
image | Image | Image storage | N/A |
Supported Constraints & Markers
| Constraint | Meaning | Implementation | Smart Validation |
|---|---|---|---|
PK | Primary Key | Creates GUID primary key + auto-generated name field | Validates single PK per entity |
FK | Foreign Key | Used for automatic relationship creation | Validates target entity exists |
UK | Unique Key | Creates unique constraint | Validates uniqueness rules |
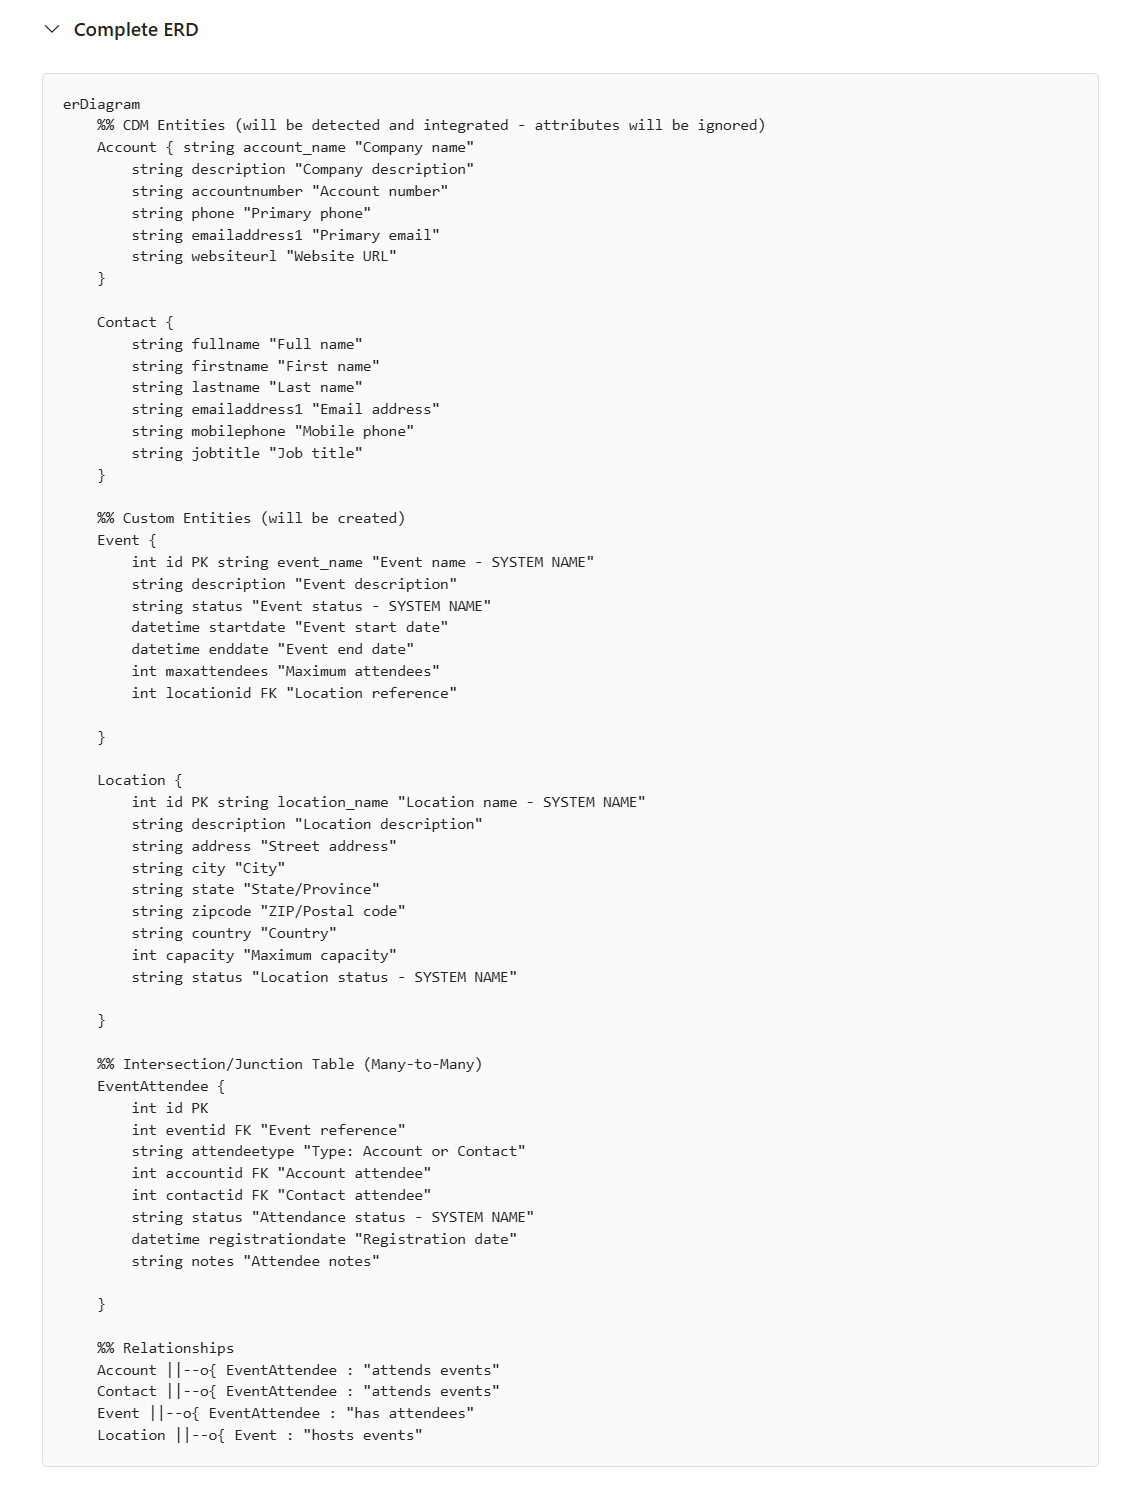
Advanced Relationship Examples with CDM Integration
Smart Processing Results:
- CDM Detection: Account & Contact identified as CDM entities
- Type Detection: website_url → URL, business_email → Email, mobile_phone → Phone
- Validation: All relationships validated, junction table recognized
- Mixed Solution: CDM entities + custom entities in single deployment
- Optimized: Best of both worlds - standard CDM + business-specific entities
Rollback Deployments
The application provides modular rollback functionality, giving you granular control over which components to remove from Dataverse while preserving deployment history.
Accessing Rollback
- Navigate to Deployment History (view past deployments)
- Find the deployment you want to rollback
- Select the "Rollback" button
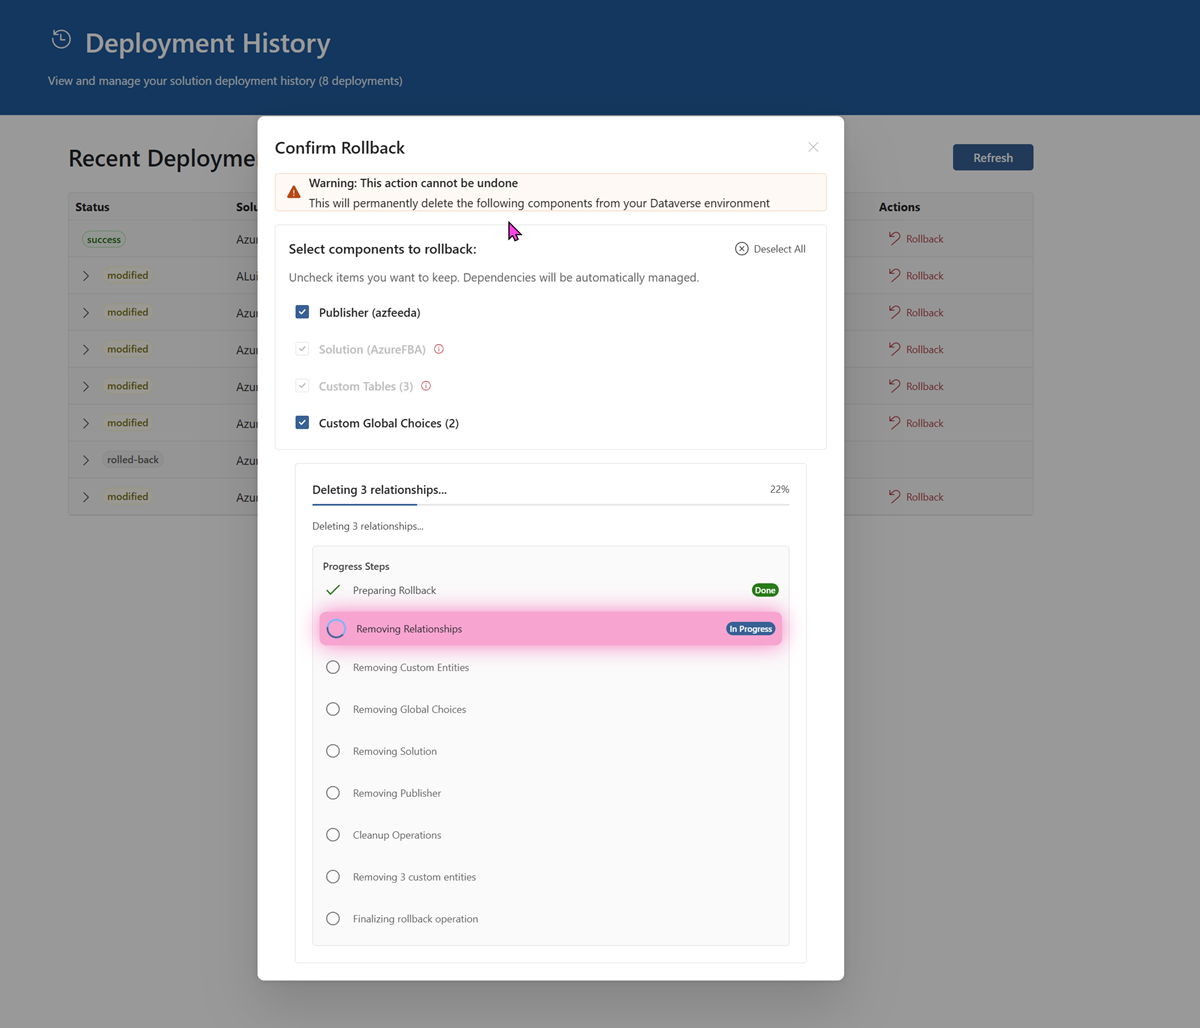
- Select components to remove
Enhanced Progress Tracking
The rollback process includes real-time progress indicators with step-by-step visibility:
Visual Progress Features:
- Step-by-Step Display: Each rollback component shown as individual progress steps
- Active Step Highlighting: Currently processing step highlighted with pink pulsing animation
- Status Badges: Clear "Preparing", "In Progress", "Completed" indicators for each step
- Time Estimation: Real-time elapsed time and estimated remaining time
- Spinner Animations: Visual feedback for active operations
Progress Steps Include:
- Preparation - Validating rollback requirements
- Relationships - Removing entity relationships
- Custom Entities - Deleting custom tables
- Global Choices - Removing custom choice sets
- Solution - Deleting solution container
- Publisher - Removing publisher
- Cleanup - Final cleanup operations
This enhanced progress tracking matches the same visual style and functionality as deployment progress, providing consistent user experience throughout the application.
Rollback Options
You can choose exactly what to rollback:
Available Components
- Custom Entities - Delete custom tables created by deployment
- Global Choices - Delete custom global choice sets
- Solution - Remove the solution container
- Publisher - Delete the publisher
Dependency Rules
The system automatically enforces safe rollback order:
- Custom Entities require Relationships to be deleted first - this happens automagically
- Solution requires all Custom Entities + CDM Entities to be removed (auto-selected)
- Publisher requires Solution to be deleted first (auto-selected)
Multiple Rollbacks
You can perform multiple sequential rollbacks on the same deployment.
Smart Tracking:
- System tracks what was deleted in each rollback
- Prevents attempting to delete already-removed components
- Each rollback shows only the components selected for that specific operation
- Deployment status updates automatically:
deployed- Active deployment with all componentsmodified- Partial rollback (some components remain)rolled-back- Complete rollback (all components deleted)
Rollback Best Practices
⚠️ Important Considerations
- CDM vs Custom: CDM entities are only removed from solution, not from Dataverse
- Publisher Dependencies: Cannot delete publisher if solution exists
- Irreversible: Rollback cannot be undone (re-deploy if needed)
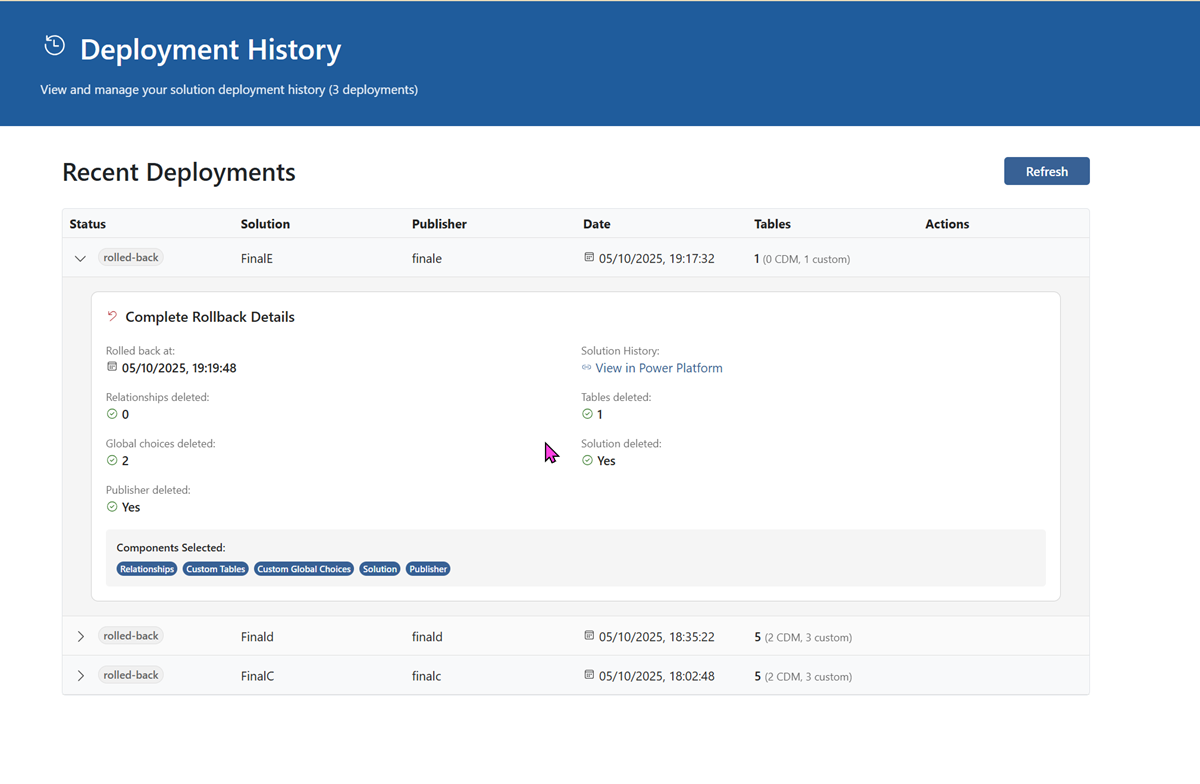
Viewing Rollback History
Each deployment card in the history shows:
- Status badge (deployed/modified/rolled-back)
- Rollback badges listing what was rolled back in each operation
- Rollback numbering in chronological order
- Component details for each rollback
Example Display:
Deployment: university_v1.0
Status: modified
Rollbacks:
  #1 - Relationships (Jan 15, 2025)
  #2 - Custom Entities (Jan 16, 2025)